 Research Article
Composite Matrix Reinforced with Carbides for Hammers of Grinding Mills
Victor Geanta1, Ionelia Voiculescu2* and Horia Binchiciu3
1University Politehnica of Bucharest, Faculty of Materials Science and Engineering, Department of Engineering and Management of Metallic Materials Obtaining, Bucharest, Splaiul Independentei 313, Romania
2University Politehnica of Bucharest, Faculty of Industrial Engineering and Robotics, Department of Quality Engineering and Indus-trial Technologies, Bucharest, Splaiul Independentei 313, Romania
3SC. SUDOTIM As S.R.L., 30 Mihai Viteazu Street, Timisoara, Romania
Ionelia Voiculescu, University Politehnica of Bucharest, Faculty of Industrial Engineering and Robotics, Department of Quality Engineering and Indus-trial Technologies, Bucharest, Splaiul Independentei 313, Romania.
Received Date: June 26, 2020; Published Date: July 15, 2020
Abstract
In the paper experimental researches regarding obtaining of composite metallic matrix by direct casting are presented. Cheap metallic materials with controlled microhardness were used for the manufacturing process. The low-cost materials were obtained from metal scrap, such as: white iron, manganese steel, austenitic stainless steel. Metallic matrix was reinforced in the maximum wear areas with different type of carbides (tungsten carbides, titanium carbides). The method described in the paper refers to the combined process of direct casting and embedding of pre-arranged carbides, in order to obtain pieces with different characteristics in different working areas. During the melting process, the chemical composition of metallic matrix can be enriched with some elements such as Cr, Mn, Ti and W that allow to formation of in-situ precipitated carbides, having the hardening effects of the hammers. The method allows obtaining, in the same time, of pieces with areas having different desired hardness and wear resistance, without require any other additional process (like brazing a hard plate on the working area exposed to severe wear).
Keywords: Hammers; Casting; carbides; Chemical composition; Microhardness
Introduction
The hammers for crushing stone from the grinding mills are made of hard metallic materials that pro-vide a high resistance to wear in severe working conditions (erosive, abrasive combined with dynamic loads). During working, the parts are exposed to mechanical fatigue, due to the repetitive loading and friction with the hard-natural aggregates (sand, ballast) or broken stone. Often the hammers for grind-ing are obtained like a compact system and are made by low alloyed steel or manganese steels. Another solution is to use composite metallic matrix, reinforced with carbides having different geometries [1 - 3] (Figure 1 and Figure 2).
The reinforcing materials are usually placed on the internal side of the centrifugal mills, where the interaction with the hard minerals is more critical, in order to keep the other zones safe. An example of the schematic of centrifugal working area are presented in Figure 3 and the flow of minerals during milling process in Figure 4 [4-7]. The surfaces of hammers are exposed to intensive friction, impact and compression during the crushing process, due to the random movement of mineral aggregates into the mills housing. For this reason, the materials used for performing the hammers are very important for assuring a good reliability of the mills. Because the hammers deterioration occurs rapidly as a result of the erosion of the active areas by wear processes, the main feature required in this application is the hardness of the material and the ability to withstand repeated impact [8-10]. The metallic matrix of the hammers can be obtained from various ferrous alloys, such as white cast iron, manganese steels, and martensitic cast steel or austenitic stainless steels. The choosing the optimum variant depends on the nature of the mineral aggregates (their hardness, tensile strength and corrosion resistance). Often, the hammers body is composed by two different parts assembled with screws (Figure 4). The part that is less exposed to the wear process is made of homogenous metallic matrix while the part exposed to erosion is made of composite material (carbides reinforced composite plates or hard-faced plates). According to the procedures for monitoring the grinding processes, the integrity of the wear plates is checked periodically and the components whose geometry no longer corresponds to the correct functioning are replaced [10].
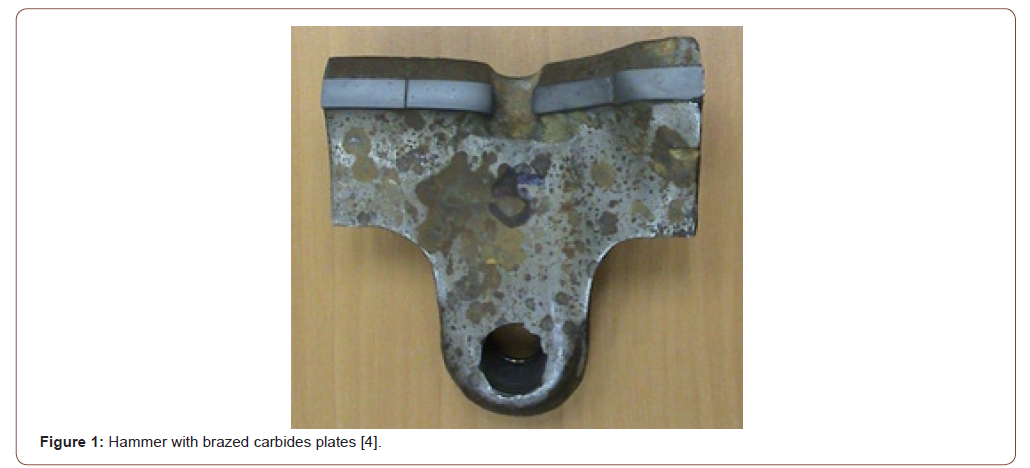
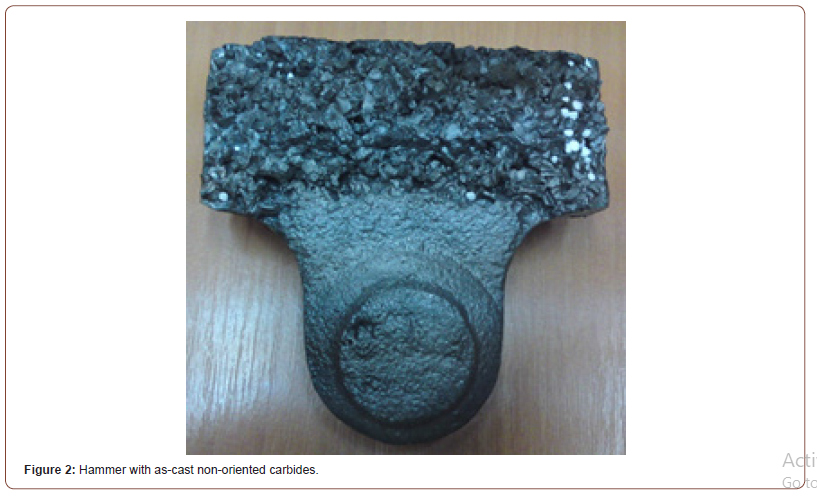


Another solution is to obtain the entire body of hammer by direct casting, performing reinforcing of the working area with carbides. The main problem is, in this case, to keep the carbides only in the desired areas and avoid the removal of them during flow of melt material [11-14]. The constructive design of the hammers must also take into account the possibility of being able to easily replace the worn parts [15-17]. For this reason, alternative solutions, such as performing a lot of spare parts, made by casting or by hard facing of used parts, often are considered [17-18]. The hard-metallic matrix obtaining is generally laborious. Direct casting process requires expensive alloying elements and often the materials become brittle. To obtain the correct geometry, subsequent machining operations using precision tools must be applied. Due to high hardness of the metallic matrix of crushing bodies often machining process is very difficult to be done, in order to good fasten hammers in the crusher.
In the paper an innovative solution for obtaining composite matrix reinforced with carbides are dis-cussed. This solution has been implemented in the case of hammers for grinding mills. In order to obtain the reinforcement area, the carbides were placed in the desired zone of the molding and then all the volume was impregnated by direct casting with liquid metallic material. After casting, the parts were machined in the mounting zone and were introduced in the crushing mill, for testing their ability to working. This solution allowed obtaining a reduction of manufacturing cost with more than 20%. The embedding efficiency of the carbides in the metallic matrix has been studied by electron microscopy on broken parts. The microhardness measurement and mass loss have been performed to evaluate the effects of chemical composition on the metallic matrix hardening.
Materials and Methods
Materials
In order to manufacture wear resistant metal alloys matrix, in the induction furnace were used scrap of ferrous alloys. Ferrous metals were selected based on their chemical composition and then were cleaned by sandblasting. The ferrous alloy waste was then washed in 20% NaOH solution in H2O, then calcined in the oven at 950 °C for 1.5 hours, then cooled in water at 15 °C. After that, the materials were grinded at different granulometric size.
To establish the optimal chemical composition of the crusher hammer were proposed several techno-logical alternatives for different 9 alloys, such as: C = 0.10-0.80wt %, Si = 0.15-1.65wt%, Mn = 0.1-2.00wt %, Cr = 0.10-3.0wt % and W = 0.01-0.70wt%. For the phosphorus and sulfur contents no restrictions on composition was imposed, due to the metallic materials selected for experiments had concentrations of these elements in the range of 0.02 to 0.04wt%. As supplementary alloying elements were used chromium, manganese and tungsten (introduced by ferroalloys) due to their ability of car-bide formers and for metallic matrix hardening.
Equipment
The experimental research on the obtainment of the metallic matrix of the hammers for centrifugal crusher was focused on its manufacturing by casting, using low alloyed steel. For adjust the chemical composition, cheap materials were used, as a way to reduce production costs. Steelmaking process was performed in an air induction furnace of 10 kg capacity, equipped with acid refractory lining, from ERAMET Laboratory from Politehnica University of Bucharest. The main technical characteristics of the induction furnace are nominal power of 40 kW; frequency of 4 kHz; voltage f 250 V; average time to develop a charge about 30 min. Crushing hammers made by casting of low-alloyed steel were analyzed in terms of chemical composition and microhardness. Chemical composition of the experimental samples was determined by optical emission spectrometry using a spark SPECTROMAX apparatus from ERAMET Laboratory from Politehnica University of Bucharest. For testing the microstructure, a scanning electron microscope Inspect S equipped with EDAX Z2e analyzer has been used, while microhardness has been measured using Shimadzu HMV 2T hardness tester, all this equipment belonging to LAMET Laboratory from University Politehnica of Bucharest.
Working procedure
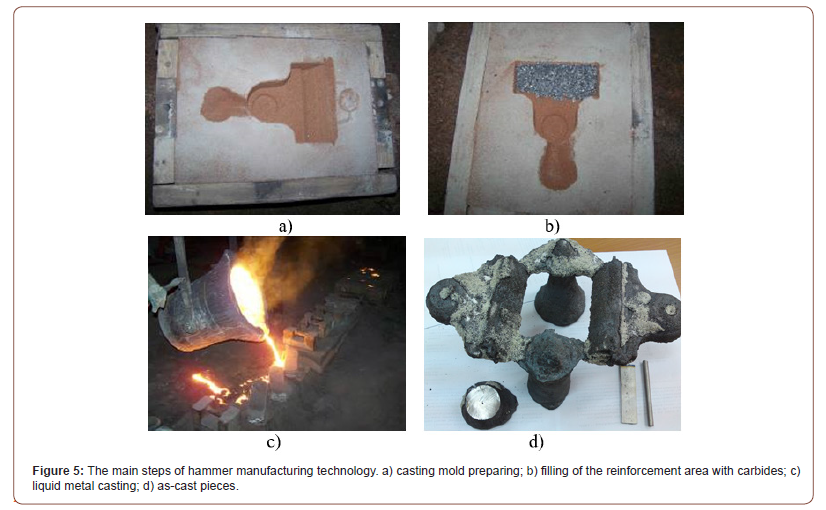
The manufacturing technology chosen for the obtainment of metal matrix for wear resistant crushing parts was a classic induction furnace melting procedure, which involves the following steps [12]: pre-paring the casting mold (Figure 5a); calculation of the chemical elements proportion and adjusting the metallic batch mass; weighing of the carbides and placing them into the working area (Figure 5b); melting the metallic material; pouring liquid metal in the casting mold (Figure 5c); cooling the parts; cut of and finishing parts (Figure 5d).
Chemical composition
After obtaining the hammers by casting process, the chemical compositions o
If the experimental metallic matrixes were determined by optical emission spectrometry and are presented in Table 1. Only the chemical elements from the matrix composition considered to have a significant influence on micro-hardness are mentioned. Phosphorus and sulfur proportions were not specifying, due to restrictions established for the raw materials.
Analyzing the dispersion of the results (in 3 different tests for each chemical composition), it was observed a good homogeneity of the chemical composition in metallic matrix of the hammers for centrifugal crushers, with low differences.
Microstructure
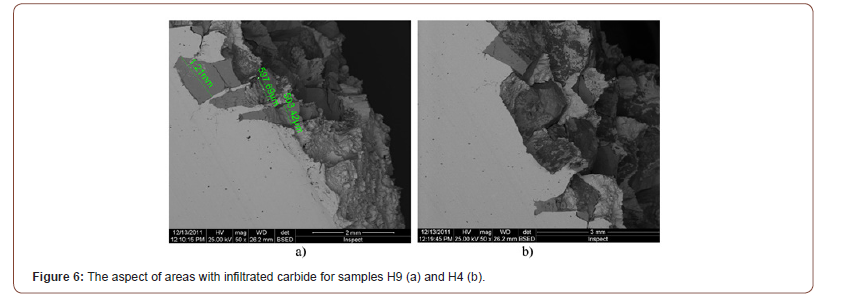
Preparation for metallographic analysis of samples with different mechanical characteristics (carbides embedded in steel) is very difficult. Therefore, the representative areas obtained by breaking the hammers were examined. In the SEM microscopy images (Figure 6), it is observed how the carbides are partially embedded in the metallic steel matrix. These are well anchored; no cracks or crushes are observed. The carbides with average sizes between 500 microns and 1.2 mm were not crushed or dislocated during sampling operation, which shows that the casting infiltration process was adequate.
Microhardness
The microhardness HV0.2 determination was performed using a force of 1.9614 N and measurement time of 10s. The results obtained for the 9 different samples are presented in Table 2. The dispersion of the microhardness values is limited, which shows good homogeneity of the material. For a relatively good workability of material, without using special grinding tools, it is considered that the optimum hardness values must be below of 400...500 HV0.2 (equivalent to about 40-50 HRC).
Table 1:Chemical composition of the metallic matrix.

Table 2:Microhardness values of metallic matrix.

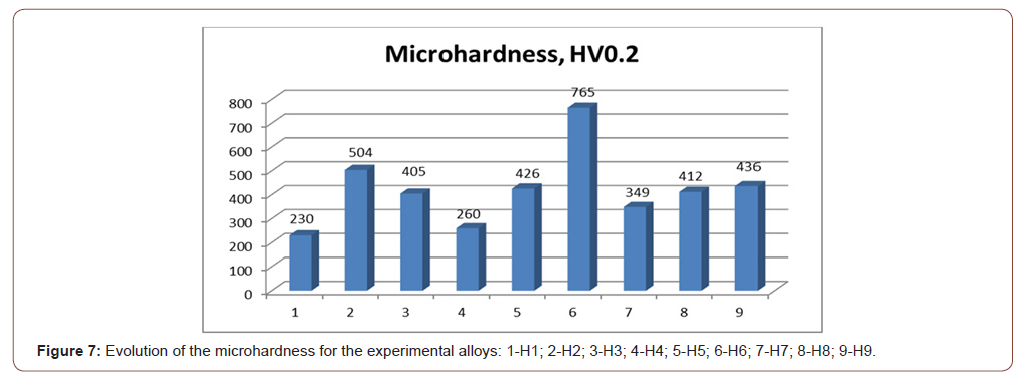
From the point of view of wear resistance, the higher hardness expresses a better behavior in the grinding process. Analyzing the average microhardness values, results that only sample H6 are situated over the desired range, with value of the 765 HV0.2. Very low values of the hardness, obtained for the samples H1, H4 and H7, are in agreement with their chemical composition, in which the contents of C, Cr and Mn are lower compared to the other samples.
If the hardness values are below 400HV, the material will not be able to have a long service life. The hardening effects promoted by the chemical elements are cumulative (Figure 7). The dramatic increases in hardness were obtained in the case of sample H6 (765HV), which had the highest chromium (2.76wt% Cr) and manganese (1.89wt% Mn) content and an average content of C (0.35wt% C). Although it has a higher content of Mn (1.96wt% Mn), the H3 sample had a lower hardness value (405HV), due to the lower contents of C and Cr. Also, with the lowest content of Mn, even it had 0.93wt% Cr and higher content of W (0.62 wt%), sample H4 is situated in undesired domain of hardness (260 HV0.2).
Mass loss by wear
For the study of the mass losses due to abrasion wear, 4 samples were selected, respectively a sample from the base material with the highest hardness (H6) and 3 samples with embedded carbides, as follows: P1 - 100% Cr carbides, P2 - 50% Cr carbides and 50% W carbides and P3 - 100% W carbides. The samples were cut with metallographic abrasive discs and then embedded in the phenolic resin. The embedding was performed to allow correct contact between the parts and the abrasive material used for testing (SiC-impregnated metallographic abrasive paper and an average granulation of 320 μm). The abrasive paper was changed every 3 minutes of use, as this is the time for which the manufacturer guarantees the abrasive properties.
Table 3:Mass losses of composite layers during the wear tests.

The samples were weighed at a time interval of 60 seconds to determine the mass losses arising from the abrasive effect. The mass loss testing was performed using an automatic planar grinder polisher Alpha Beta machine, equipped with Vector polisher head, which can ensure the individual pressing with equal force of 4 samples simultaneously. After the samples were embedded, part of the embed-ding resin was removed to expose only the surface of the hard particle layer. Before being tested for wear resistance, the samples were weighed using the KERN ABJ precision balance to determine their initial mass. The rotational speed of the grinding machine plate was kept constant (400 rpm/min), and the rotation speed of the Vector head was 80 rpm/min, the inversed rotation of the head being per-formed to increase the wear effect. Each sample body was pressed with a constant force of 53.4N. The values of the mass losses measured during the wear tests are presented in Table 3.
Most of the values of the mass losses are less than 0.1g. The correlation between the values of micro-hardness and the wear resistance in the case of a certain type of wear depends very much on the effect of the superficial deformations that occur in the contact area. Thus, it can be considered that the micro-hardness of a carbide layer is a valid indicator regarding its wear resistance.
Using Weistrass approximation theorem and the “smallest squares” method for interpolation, has been obtained equation (1) for describing the evolution of mass losses and equation (2) for describing the evolution of the hardness of the layers.

The percentage error calculated for the equation 1 and the actual profile of the mass loss values is in the range 3.75 ÷ 9.67%. In the case of equation 2 the percentage error is in the range 1.57 ÷ 8.64%, errors considered to be within acceptable limits. The wear resistance testing technique has led to obtaining information regarding mass losses in case of wear by dry abrasion. As result of analyze of the data shows in Table 3, the resistance to dry abrasive wear of the composite layers was 2 to 6 times higher than that of the base material (H6 sample). All the samples reinforced using carbides express a lower mass loss comparatively with base material. The best results have been obtained for the sample reinforced using only tungsten carbides (P3) and then for the sample having a mixture of WC and chromium carbides (P2).
Conclusion
To improved design of the hammers used for mills, a metallic matrix with tungsten carbides embedded has been developed. The Fe-base designed metal matrix contains also other elements such as Mn, Cr, Si, Co, Ni, Al, Cu and P. Some of alloying elements lead to reduce of metal alloy melting point, to in-creasing the hardness, to improving of the wettability and flowing capacity of metal.
For a relatively easily mechanical working of the retention sills, is indicated a microhardness value situated in the range from 400 to 500 HV0.2, equivalent to 40 - 50 HRC.
The chemical composition of the hammer alloy was chosen so as to obtain the best hardness and machinability values. Thus, metallic matrix must contain a sufficiently high carbon content which can ensure the formation of carbides (about 0.5 wt. % C).
The microhardness values are influenced by the chemical element’s combination and proportions, like (C + Mn, C + Cr, C + W, Mn + Cr, Mn + W, Cr + W). The lowest microhardness values were obtained at low carbon content value (0.21%), combined with low content of (Mn + Cr) (in the case of sample H4). Values of microhardness situated in the desired field (504 HV0.2) was obtained for a carbon content of 0.62 wt. % and value of (Mn + Cr) content of 2.78 wt. %.
The microhardness values are influenced by the chemical element’s combination and proportions, like (C + Mn, C + Cr, C + W, Mn + Cr, Mn + W, Cr + W). The lowest microhardness values were obtained at low carbon content value (0.21%), combined with low content of (Mn + Cr) (in the case of sample H4). Values of microhardness situated in the desired field (504 HV0.2) was obtained for a carbon content of 0.62 wt. % and value of (Mn + Cr) content of 2.78 wt. %.
Acknowledgement
The research work was financially supported by the Romanian National Program for Research in the framework of the Project No. PCCA 209/2012 “Composite structures resistant to dynamic loadings applied at high deformation speeds used in the field of collective protection – HEAMIL” and by a grant of the Romanian Ministry of Research and Innovation, CCCDI – UEFISCDI, project number PN-III-P1-1.2-PCCDI-2017-0239/20 PCCDI 2018, “ Individual and collective protection systems for the military domain based on high entropy alloy - HEAPROTECT”, within PNCDI III.
Conflict of Interest
No conflict of interest.
References
- Sujit KD, Shobhana D, Avimanyu D (2013) Commination features in an impact hammer mill. Powder Technology. 235: 914-920.
- Olawale JO, Ibitoye SA, Shittu MD (2013) Work hardening behavior and microstructural analysis of failed austenitic manganese steel crusher jaws, Materials Research 16(6): 1274-1281.
- Tiwary RK, Kalet M, Karmakar D, Bhakat AK (2016) Application of Improved Quality Abrasion Resistant Materials in Hammer Head and Screens for Coal and Coke Preparation Units of Integrated Steel Plant. International Journal of Metallurgical Engineering 5(2): 25-30.
- Geanta V, Voiculescu I, Stefanoiu R, Binchiciu R, Negriu RM (2012) Retention threshold for centrifugal crushers, Patent no. RO 125587/2012.
- US Patent 3970257/1976.
- J Rodriguez, D Rodriguez (1990) Tip holder for mineral breake. US Patent Number 4910188.
- Nikolov S (2004) Modeling and simulation of particle breakage in impact crushers. International Journal of Mineral Processing 74(10): S219-S225.
- Sare IR (1983) Repeated impact-abrasion of ore-crushing hammers. Wear 87(2): 207-225.
- Teeri T, Kuokkala VT, Siitonen P, Kivikyto P, Liimatainen J (2006) Impact wear in mineral crushing. Proc. Estonian Acad Sci Eng 12(4): 408-418.
- Hesham AF, Yasser MA, Tarek HAM, Hanafi AR (2015) Redesign and manufacture an impact crusher hammer mill using advanced iron casting. Global Journal of Advanced Research 2(7): 1196-1209.
- Voiculescu I, Geanta V, Stefanoiu R, Patroi D, Binchiciu H (2013) Influence of the Chemical Composition on the Microstructure and Microhardness of AlCrFeCoNi High Entropy Alloy. Rev Chim Bucharest 64(12): 1441-1444.
- Geanta V, Stefanoiu R, Voiculescu I (2011) Experimental Researches on the Graphite Particles Dissolution during Injection Process in Ferrous Metallic Melts. Rev chim Bucharest 65(1): 94-97.
- N Makrides, EA Stephenson (1982) Cast part with compact, wear- resistant parts and process for manufacturing such a part. Patent application, No. 8207233, France.
- GM Terrenzio (1986) Impeller assembly for an impact crusher. US Patent Number 4577806.
- Ezurike BO, Osazuwa OJ, Okoronkwo CA (2018) Design, construction and performance evaluation of a flat screen hammer mill machine. African Journal of Science, Technology, Innovation and Development 10(6): 683-690.
- Fenchea M (2012) Design of hammer mills for optimum performance. Journal of Vibration and Control.
- Garleanu D, Garleanu G (2019) Effect of Chemical Composition on Hard Deposits Properties in the Case of Weld Refurbishment of Heavy Crushing Hammers. Rev Chim Bucharest 70(2): 417-424.
- Geanta V, Voiculescu I, Chereches T, Zecheru T, Matache L, et al. (2019) Behavior to Dynamic Loads of Composite Multi-layer Structures. Mat Plast Bucharest 6(2): 460-465.
-
Victor Geanta, Ionelia Voiculescu, Horia Binchiciu. Composite Matrix Reinforced with Carbides for Hammers of Grinding Mills. Glob J Eng Sci. 6(1): 2020. GJES.MS.ID.000630.
-
Hammers, Casting, carbides, Chemical composition, Microhardness
-

This work is licensed under a Creative Commons Attribution-NonCommercial 4.0 International License.


